crocheted bleach bottle bag
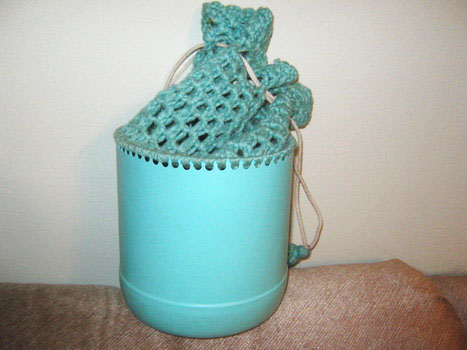
Remember these? It was once “in” to cut a bleach bottle in half, punch holes along the top edge and crochet around the top to create a tote bag. This was a long time ago, admittedly, but some of these are still in use, like the one in our photo. They were used as purses, or containers for hair rollers, or as sewing caddies.
Supplies:
- Bleach bottle
- One-hole punch
- Crochet hook – G
- Acrylic or cotton yarn
- Shoelaces or nylon cord
If you would like to revive this old idea, begin by thoroughly rinsing an empty plastic bleach bottle. Dry it and cut off the top about seven inches from the bottom. Any plastic bottle will work, arguably, but plastic bleach bottles are uniformly round and easier to work with than juice or milk containers. Cut smoothly, leaving no ragged edges.
With a single hole punch, put holes around the top rim of your bleach bottle. They should be about ¼ inch from the top and ¼ inch apart.
Loop your choice of yarn – acrylic or cotton work well – through one of the holes and crochet one loop through each hole of the bottle. For the second row, chain three, then double crochet in the second stitch. Chain one and double crochet, skipping one stitch. Continue chaining one and double crocheting in every other stitch all the way around. At the end of the row, chain three and repeat. Continue until the top is about six inches high, about nine rows.
For row ten, chain three and turn, double crochet in the next stitch, then crochet five. Skip five stitches and double crochet, crochet five and skip five again, continuing for the whole row.
Row eleven, chain three, turn and double crochet in the next stitch. Chain three and skip three stitches, double crochet, chain three and skip three stitches, across. Repeat for row twelve.
Row thirteen, chain three, double crochet in the next stitch, then chain three skip one stitch and double crochet in the next, chain three and repeat all the way around.
Using a pair of 24 inch shoelaces, or two 24 inch lengths of nylon cord, thread them through the spaces left in row ten. Thread one string over and under the “posts” in row ten. Thread the second string so it alternates with the first: where one goes over, the other goes under. Tie the ends of each string together. Pull, and the top of the bag will gather together. The strings make handles as well.
You can add pom-poms or beads, etc. to the ends of the strings if you wish. You can also add decals or paste on decorations of your choice to the body of the plastic container.