Old-Fashioned Paper Chain Belts
Objectives
With the revival of interest in all handicrafts, this old-fashioned favorite should not be ignored. Handcrafted from colorful magazine pages or wrapping paper, the belts are easy and fun to make. Students are fascinated by the technique of folding and attaching link after link into chain belts. A minimum of tools, the development of precise folding skills, and strong personal motivation all combine to make this a very popular project.
Materials
2 x 1-inch strips cut from colored magazine pages or wrapping paper, scissors, paper cutter, rulers, pencils, cardboard, large paper clips, an old belt buckle, colored string or ribbons for closure.
Procedure
1. As the paper strips will be folded six times, use paper that is about the thickness of wrapping paper. if it is too thick, it will be impossible to fold; if too thin, it will not be strong enough.
2. Since the students will need 30 or 40 links to make a belt, the easiest way is to cut the strips on a paper cutter if one is available. If not, use a scissors and a 2- x 10-inch cardboard template.
3. Put the folding diagram shown in Figure 9.3 on the board and demonstrate the technique. Have the class practice it until they have mastered the technique.
4. A series of six folds will rapidly produce a chain link. Do the steps slowly at first until the students are familiar enough with them to proceed without any problem.
5. Follow this procedure: (See Figure 9.3)
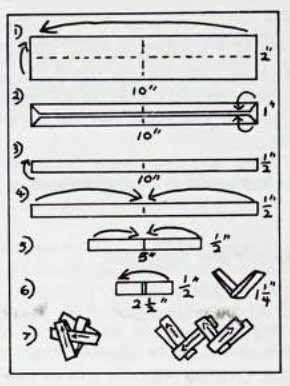
Figure 9.3
Step 1: Fold the 2- x 10-inch paper strip in half vertically and horizontally to establish centre lines.
Step 2: Unfold the paper. Then fold the top edge down to the centerline and the bottom edge up to it. The strip i snow 1 x 10 inches.
Step 3: Fold the bottom half up to the top edge. The strip is now1/2 x 10 inches.
Step 4: Now fold each 1/2 inch edge toward the center. The strip is now 1/2 x 5 inches.
Step 5: Again fold each 1/2-inch edge toward the center. The strip is now 1/2 a 21/2 inches.
Step 6: Bend both halves up into a link. Each link has two open ends and a closed end.
Step 7: After folding half a dozen links, practice inserting them correctly into each other
to form a chain. To make the chain, insert the open ends of one link into the center of the folds of another link. Pull the link tight and insert a third link into the second one.
6. Fold and attach as many links as necessary to complete a chain long enough for a belt. The belt can be closed with an old belt buckle, a large paper clip, or a piece of colored string or ribbon.
Bonus Ideas
- Use clear cellophane from discarded packages to make a belt with very unusual and striking links.
- Less advanced classes can use the paper chains for necklaces, India headbands, or hatbands.
- More advanced classes can discover other decorative uses for paper link chains such as attaching them to cardboard for picture frames, or using very large links to make decorative chains to stretch across the room for parties and holidays.
Open Library

PROFILE
Open Library is an open, editable library catalog, building towards a web page for every book ever published.
Open Library is an initiative of the Internet Archive, a 501(c)(3) non-profit, building a digital library of Internet sites and other cultural artifacts in digital form. Other projects include the Wayback Machine, archive.org and archive-it.org
Books to Borrow
Books in this collection may be borrowed by logged in patrons. You may read the books online in your browser or, in some cases, download them into Adobe Digital Editions.
Main Research Source
 What have we learnt?
I think what attracted me to these instructions was the title – this was thought of as old fashioned in 1977 when most people say this craft had its heyday in the 60’s.